Pumpkin Spice Pan de Muerto
Pumpkin Spice Pan de Muerto
Fermented Dough
Demo and Recipe Below!
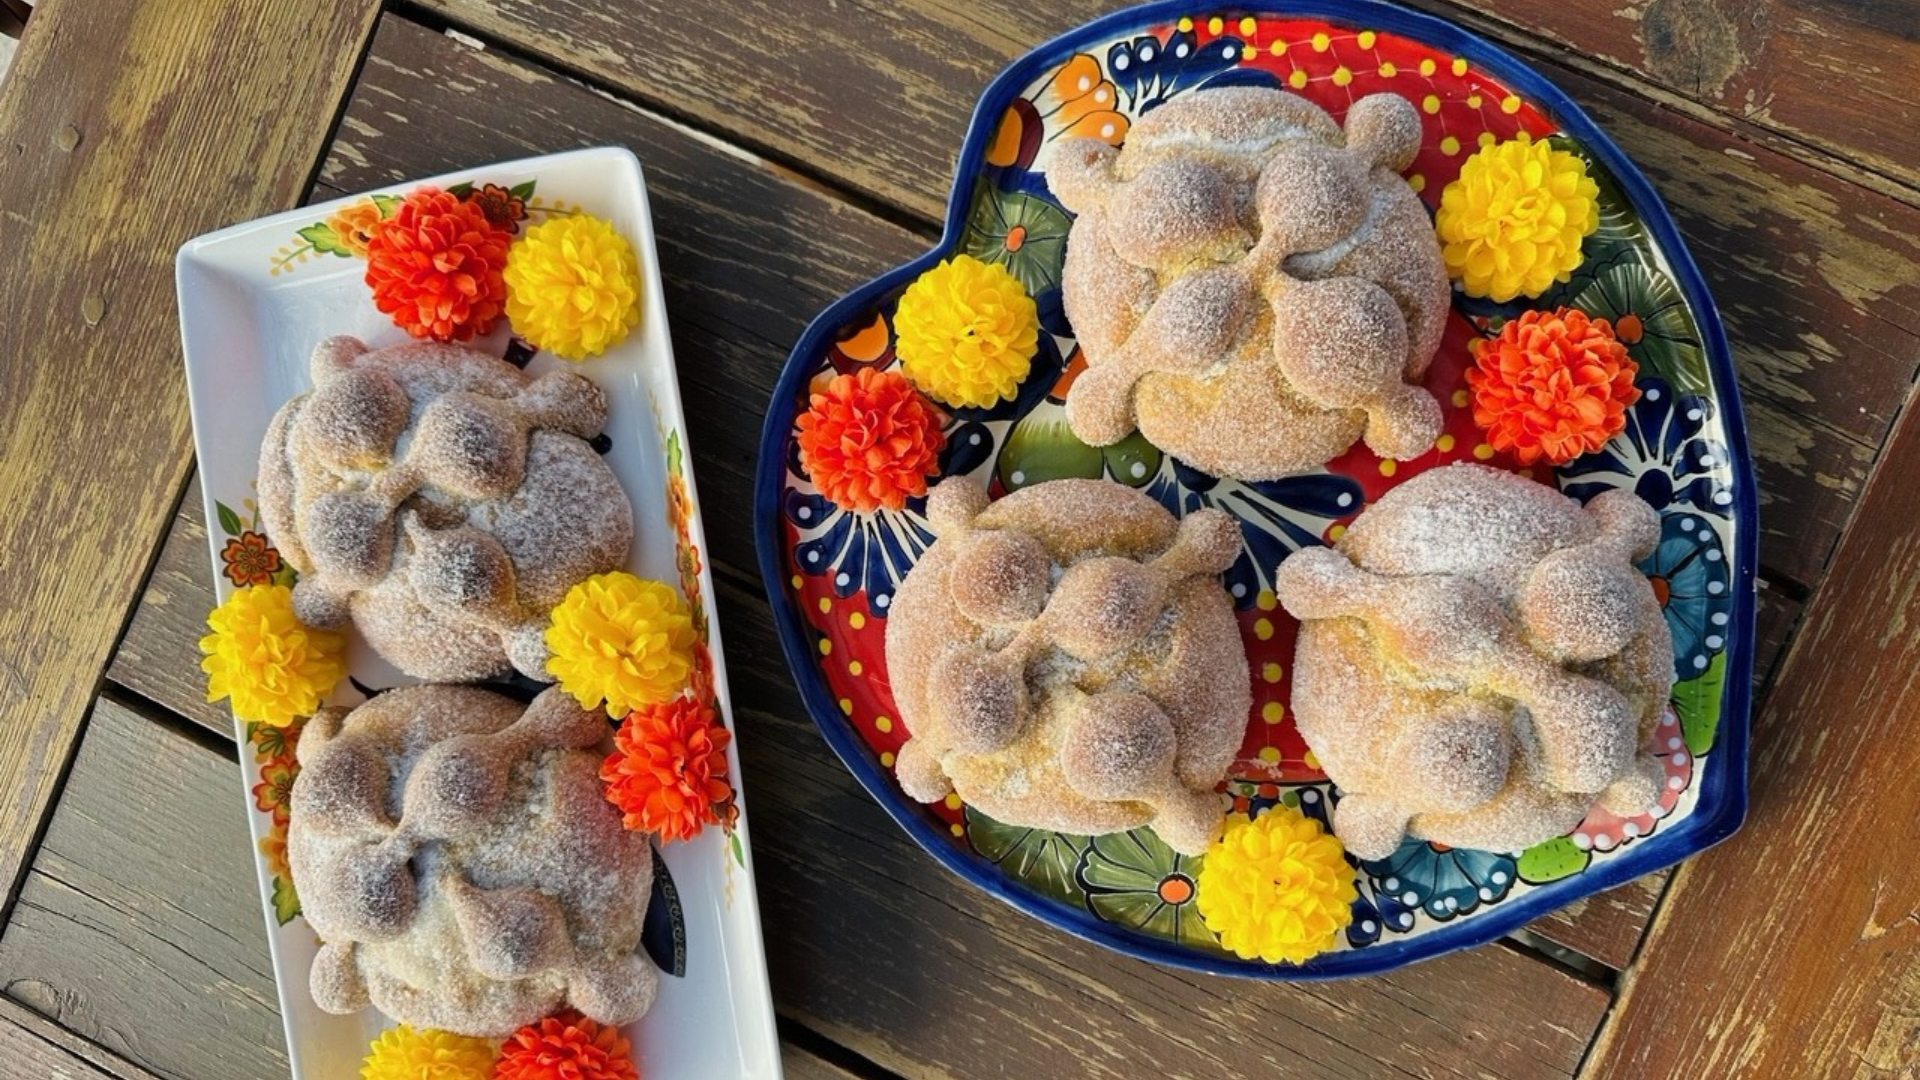
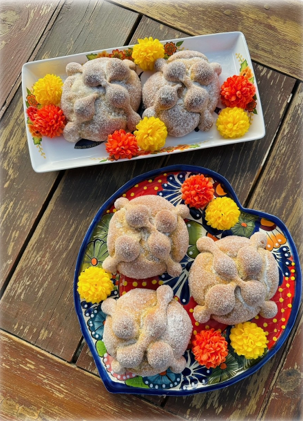
Building on the heritage of the original pan de muerto, a traditional sweet bread baked in honor of Día de los Muertos, we've added a blend of pumpkin puree, cinnamon, nutmeg, and cloves, transforming it into a new fall favorite. The subtle sweetness of molasses and the richness of dark brown sugar, paired with a tangy cream cheese center, creates a perfect balance of flavor, texture, and nostalgia.
This recipe offers a fresh take that maintains the essence of the classic while adding a seasonal flair. It’s an excellent example of how the beauty of tradition can be celebrated while embracing new ingredients and flavors. Perfect for Día de los Muertos celebrations or simply enjoyed with a cup of coffee on a crisp autumn morning.
Ingredients
Pumpkin Spice Pan de Muerto Dough
Yield: 10, 90-gram tumbas
350 grams (2 1/2 cups) unbleached all-purpose flour
150 grams (1 cup) whole wheat flour
21 grams (3 packages) instant yeast (fast-acting)*
60 milliliters (1/4 cup) whole milk
240 grams (1 cup + 2 tablespoons) pumpkin puree
150 grams (3 large) eggs
60 grams (1/4 cup) granulated sugar
60 grams (1/4 cup) dark brown sugar
15 milliliters (2 tablespoons) blackstrap molasses
15 milliliters (1 teaspoon) vanilla extract
4 grams (2 teaspoons) fine-ground cinnamon
2 grams (1 teaspoon) fine-ground cloves
2 grams (1 teaspoon) fine-ground nutmeg
10 grams (2 teaspoons) salt
115 grams (1/2 cup) unsalted butter**
Total dough weight: 1,244 grams
*The yeast can be reduced to 14 grams (2 packages) for a more controllable dough.
**The butter should be at room temperature and cut into cubes.
Cream Cheese Filling
Yield: 10, 50-gram portions
225 grams (1 cup) cream cheese
150 grams (3/4 cup) granulated sugar
50 grams (1 large) egg
30 grams (1/4 cup) all-purpose flour
5 milliliters (1 teaspoon) vanilla extract
Optional: 2 grams (1/2 teaspoon) pumpkin pie spice
Total topping weight: 500 grams
Equipment:
6-quart electric stand mixer with paddle and dough hook attachments
One plastic dough scraper
Rubber spatula
Dough thermometer
Handheld wire whisk
Digital scale with gram capabilities
2-ounce portion scoop
2-quart bowl
2 bar towels
Plastic wrap
6, ¼ sheet baking trays or 3, ½ sheet baking trays
Dough Mixing Procedure
In the bowl, combine both all-purpose and wheat flour, then pour the dry yeast over the flours and mix by hand using the wire whisk (mix thoroughly). Place the stainless-steel bowl aside.
Add the pumpkin puree, milk, molasses, eggs, granulated sugar, dark brown sugar, and vanilla to the bowl of the stand mixer. Combine by hand with the wire whisk.
Attach the paddle attachment to the mixer.
On low speed, using a small scoop or measuring cup, gradually mix in the flour and yeast mixture to make a very soft dough. 1 minute on stir.
Add the salt and spices and continue to mix for 30 seconds on 4th speed.
Stop the mixer and remove the paddle attachment, then scrape the sides of the bowl using a plastic scraper. Attach the dough hook.
Using the dough hook, knead on medium speed until the dough is cohesive, but still quite soft. 2nd speed for 30 seconds.
On 2nd speed, add the butter in increments – 1 minute.
The dough will become very slack, but continue to knead until it firms up.
After kneading for 4 minutes, stop the mixer and lower the mixing bowl.
Using the plastic scraper, scrape down the sides of the mixer so the dough forms.
Continue to knead for an additional 20 - 25 minutes on 4th speed, scraping in 10-minute increments. Mix to full dough development. The need to knead.
Dust the countertop with flour.
Remove the dough from the mixer using the plastic dough scraper.
Invert the dough bundle onto a flour-dusted countertop.
Shape and round the dough using a tuck-and-pull method to shape the dough into a rounded and smooth ball.
Place the dough in a buttered or greased bowl. Cover tightly with plastic wrap and set aside for 60 minutes. The dough can be refrigerated, not to exceed 18 hours.
While the dough ferments, make the Cream Cheese Filling. Place the prepared filling in the refrigerator to chill for 30 minutes before using.
Filling Procedure
Add cream cheese and granulated sugar to the mixer bowl and mix for 1 minute on 2nd speed using the paddle attachment.
Continue to mix for 2 minutes on 6th speed to incorporate.
Using the rubber spatula, scrape the bowl.
Add egg, flour, and flavors to bowl and mix for one minute on 2nd speed.
Continue to mix for 2 minutes on 6th speed to cream together.
Scrape using a rubber spatula and continue to mix for 2 minutes on 6th speed. Place in a bowl and cover using plastic wrap. Place under refrigeration for 30 minutes. The filling can be prepared one day in advance.
Tumba Procedure
Once the dough has fermented, remove the plastic wrap and place it onto a floured surface.
Fold in the four corners of the dough to form a bundle, then invert onto a floured surface.
Flatten the dough to form a rectangle shape.
Using the plastic dough scraper, divide the dough into four equal strips.
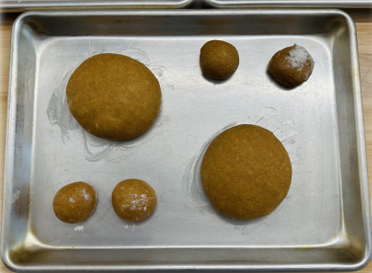
Cut the dough strips into the listed amounts and use the digital scale to precisely weigh the dough pieces. You will need 10 pieces at 90 grams and 10 pieces that are 30 grams (which will then be divided in half).
Round the 90-gram dough pieces and place onto a greased sheet pan (2 per ¼ sheet, 4 per ½ sheet, and so on).
Take the 20, 15-gram dough pieces and round each one into a dough ball. Stage two, 15-gram dough pieces, besides the 90-gram dough pieces.
Give the dough pieces a 15-minute 1st intermediate fermentation.
This will allow the gluten strands to relax and make it easier to maneuver the dough.
Once rested, take each 90-gram dough piece and flatten to a 5-inch (12.7 centimeter) disk.
Using the portion scoop, deposit 35-40 grams of filling in the center of each disk.
Take the four corners of the dough disk and enclose the filling, making sure to crimp and seal before inverting the dough piece back onto the greased sheet pan.
Give the filled dough pieces an additional 15-minute 2nd intermediate fermentation.
To make the “bones”, use your index or middle finger to carefully roll each 15-gram dough ball by pressing down in the center, being careful not to divide the dough piece.
Using both hands (index fingers), carefully roll the ends of each piece between your fingers, being careful not to tear the dough. The bones (dough pieces) should now look like 4-bead strands.
Take two dough strands and carefully place them beside the filled, 90-gram dough balls.
Gently press on the edges of the 90-gram dough ball to improve circumference and symmetry.
Take the dough strands from the ends and carefully stretch them, then place them over the 90-gram dough piece in a crisscross pattern. Repeat with both dough strands to form crosses over the tumbas.
The tumbas are now ready for a final proof. Let them stand in a warm place (about 75ºF / 24ºC) until the tumbas are doubled in size (about 30 minutes).
Position racks in the top third and center of the oven and preheat to 350ºF/180ºC. If you have a convection feature, use it. There’s no need to adjust the temperature.
Bake, switching the position of the pans from top to bottom and front to back halfway through baking, until the tumbas look golden brown, 18 to 20 minutes.
Let cool completely on the pans.
Melt the 60 grams of butter for decorations (can be placed in a microwave or a conventional oven).
Using a brush, gently brush the tumbas with melted butter.
Let them sit for 1-2 minutes before tossing in granulated sugar.


More posts and recipes!
Alex Peña
“Baking is the most rewarding part of my culinary experiences.”
Subscribe
Get baking updates!
